

Photo by Glenn Carstens-Peters on Unsplash
How to start unit testing your Javascript projects - Pt.1
with Jest


What is and why you should write automated tests for your code
As the name already say it all, automated testing is a way to check whether your code behaves as expected or not. It works by running your code through a suite of written tests and verifying if they meet certain criteria.
You're probably wondering why writing tests if you can always do manual testing by debugging with the IDE debug feature or just by consoling log through your code, and I agree with you, but have you thought about how tedious those approaches are ? And bigger your codebase is, harder it gets to test your code by this approach.
Now imagine all those pieces of code working simultaneously, asynchronously and interdependently. Can you picture how hard it can be to test?
For the purpose of this post, we're only discussing here unit testing. In brief unit testing tests only a unit of code and that can be a returned value from a function or a class's method for example.
What is Jest?
Firstly let's first define what Jest is. According to its official docs, Jest is a testing framework for Javascript with focus on simplicity. It works on a variety of javascript libraries and framerworks such as React, Angular, Vue, Node and more. We can think of it as a test runner with matchers. One of its most important features are:
- Simply testing setup;
- Code snapshots;
- Isolated tests;
- Well documented API.
Besides, Jest has its own methods for mocking functions and testing exceptions. Among all these functionalities, I think one that really stands out it's the test coverage, which means Jest let us know how much of our code we are actually testing by providing something called code coverage. We just need to add --coverage flag when running the tests and we get a complete report to see which lines are being tested and which aren't.
So enough of this talk and let's code. Before trying on your own, make sure to have Node.js installed on your system by typing node -v on a terminal. If you don't get back a version, it means you don't have it and need to install it. There are several ways on how to install Node.js depending on your system, but I recommed using NVM.
Project setup
Once chosed the directory, let's start by typing on the terminal the following commands to setup our node project and installing the Jest dependency:
npm init -y
npm install --save-dev jest
- The
-yflag simply means 'yes' to all the questions npm may prompt us.
Now we open it with our preferred IDE, here I'm using VSCode.
Ok, at this point we only have package.json and package-lock.json files and a node_modules folder. Before we can continue, you should edit the test script line on the package.json file:
{
  "scripts": {
    "test": "jest"
  }
}
Let's get started by creating a main.js (or whatever name you feel) file in the root and writing down the simply function:
function greetings(name) {
  return `Hello ${name}`;
}

module.exports = greetings;
As you may suspect by the function's name or just by its simplicity, this is only a function that gets a name as its parameter and returns a greeting string. We also export the function so it can be used somewhere else.
And now let's write its first test by creating a main.test.js file which will look like this:
const greetings = require("./main");

it("should greet someone by passing its name as a parameter", () => {
  const name = "John Doe";
  const greeting = greetings(name);

  expect(greeting).toBe("Hello John Doe");
});
In the main.test.js file we first need to import the function from main.js by requiring it. Also we see we have a special method called it() that gets a string and a callback function as its parameters. This is a method from Jest library where we write our test itself and we can replace it with the method test(). Here I'm using it() because it is much easier to read and I can start with by saying what the code should do. We can group a bunch of it() by a describe() block, but we will still get to that.
So after writing down what I should expect from the specific test, I code how to perform it. I start by declaring a constant called name with a string, passed it down to the greetings function and get the returned value to a new constant. So it is with this returned value that I should test or compare what I expect from the function. For that we need the expect() method to check whether the test success or not. Along with expect() Jest deliver us a set of "matchers" so we can use them to validate a lot of things like strings, numbers, booleans, objects ... Here we're using the matcher toBe() to compare two strings: the one that I expect and the one that the function greetings returns to us. On the next posts, we're going to be dealing with other matchers.
These methods it() and expect() come with Jest and there is no need to import them.
Although is written in Javascript we can easily read in plain english: "Expect greeting constant to be Hello John Doe".
To avoid a false positive result, we can also test our function against what it should not return. We can simply do that by prepend toBe() matcher with not:
const greetings = require("./main");

it("should greet someone by passing its name as a parameter", () => {
  const name = "John Doe";
  const greeting = greetings(name);

  expect(greeting).toBe("Hello John Doe");
  expect(greeting).not.toBe("Good bye John Doe");
});
Running the test
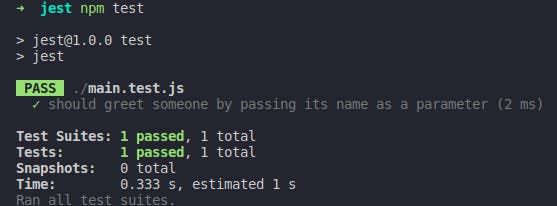
Now we have both the main.js and main.test.js files, we can run our test by typing npm test on the terminal and see it passing:
Conclusion
Ok guys, we finish this article for now and I'd just like to add that tests are really important not only to automate testing to the code we write, but as you might have noticed it also works as documantion to our code as it's easy to read and to know what to expect to how the code should behaves.
This was our first part of the series. Stay tuned for the second one.